Guide to Warehouse Labelling
Reviewing warehouse labelling in your facility is a valuable way to improve organization in the warehouse and look for new efficiencies. However, choosing labels can be challenging, and many need help getting started. That is why we have provided a guide on labelling and how it can be used effectively in the warehouse.
Why is labelling important in a warehouse?
Warehouses are often fast-paced environments, with merchandise frequently coming in and out of the facility. Proper organization helps ensure that operations run smoothly. Warehouse labels provide an easy, effective, and low-cost way to keep warehouses organized. This helps improve productivity, efficiency, and safety in the workplace.
One of the ways warehouse labels achieve this is by eliminating guesswork. Every piece of merchandise has a designated space. The labels allow workers to quickly identify and locate product information, making sorting and retrieval easier and minimizing mistakes caused by human error. This also makes it easier to identify gaps in current practices, allowing for easier optimization of warehouse space and operations.
How do I label a warehouse?
Before implementing warehouse labelling, it is essential to understand the organizational and environmental requirements of the warehouse. For example, in outside areas, labels must be made to withstand weather conditions, so plastic or polyester labels would be better than paper.
An excellent place to start is to look at the current warehouse layout and practices and identify what needs or would benefit from being labelled. Below are factors to consider with reviewing the warehouse space.
Label types
There are several types of warehouse and racking labels in a facility. General types of labels that can be used in various warehouse settings are discussed below. In addition, detailed product descriptions can be found in our new downloadable catalog. Other label examples can also be found in this article. Purchase labelling and identification products here.
Ticket holder/pouches
Ticket holders are typically made from plastic, with a pouch or pocket designed to hold a “ticket” displaying information about a product. Ticket holders often come in magnetic or self-adhesive varieties placed directly in the desired location (e.g., racking beam), making it permanent or semi-permanent. However, the ticket can be changed easily, making it ideal for fast-paced or changing environments.
Label holders
Label holders have the same function as ticket holders, and the names may be used interchangeably. Label holders, too, often come in magnetic or self-adhesive varieties.
Magnetic tape or markers
Magnetic tape or markers are reusable labels that can be customized and moved easily. The user places the tape in the desired location and writes directly on it with a wet wipe marker. Information can be changed by simply wiping it off with a damp cloth.
Self-adhesive labels/markers
Self-adhesive labels/markers are placed directly on the desired location (e.g., beam). They are often durable and resistant to peeling/tearing but can be challenging to remove. An example includes a self-adhesive stock identity slider.
Floor labels/markers
These labels are found on the floor and provide information about the given areas. Floor markers denote location, guide traffic, warn against hazards, divide spaces, etc. An example of a floor marker is the Floor Marking Tape for Lanes and Stairs. Other examples can be found here.
Labeling Materials
Labels can comes in many materials. We offer a wide variety of materials for hard-wearing code labels in a warehouse. These include:
- Polyesters
- Colored Vinyl
- Polypropylene
- Deep Freeze
- Magnetic
- PVC
- Styrene

Examples of labels you can use:
Standard Label options include:
- Black on White
- Black on Yellow


Design layout and direction
It is vital to know the design layout and direction when labelling. For example, a label may be used to identify the aisle of a racking system. However, within that aisle, there are likely multiple levels or rows. Therefore, it is good practice to identify each level individually and have a label at eye level, showing workers what is found from top to bottom. Below are examples of labels used in different layouts.
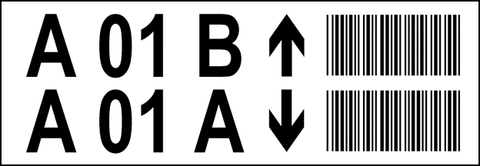
Double Locations Design Layouts for First Beam Levels
Labels can incorporate locations, directional arrows, barcodes and check digits.
- This reduces the quantity of labels required, minimizing cost.
- Use bold text on white or yellow which offers clear identification.
- They are ideal on the floor and first beam level.


TIP: Staggered barcodes reduces mis-scanning issues.
Use directional arrows for total avoidance of doubt.
Single Location Design Layouts for Upper Beams Levels
- Clear and precise identification for each pallet location
Location code, directional arrow, barcode and check digits can be added to single location labels to improve identification.

Including a barcode on upper levels helps assist with stock checks.


Use of spaces within human readable text helps the picker.

Use of hyphens within human readable text helps the picker.
Summary Location Design Layouts for First Beam Levels
These label are ideal where orderpickers are not available. They can be scanned from the first beam level.
Summary labels are positioned on the first beam level and detail the locations and barcodes for all upper levels. Workers can scan the required location from the ground, without the needing to leave the order picker.


Upright Location Design Layouts
Upright markers are ideal for use in walkways, fire exits, or tunnel bays. The markers act like the summary labels and allow workers to scan upper level locations from the ground.
- Rigid PVC plates positioned at eye level
- Ideal for walkways

Color-coding
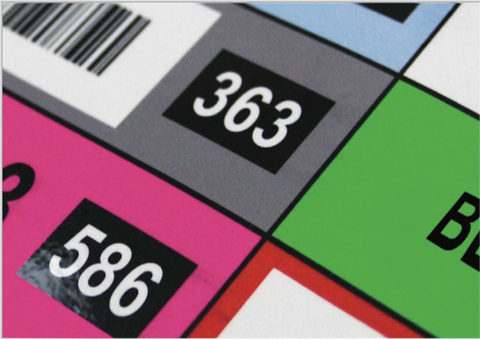
Color-coding labels is a way to minimize errors and misunderstanding as well as improving organization and workflow in the facility. These labels create a visual check point and reminder that indicates the location of products and merchandise.
Full color summary labels positioned on the first beam level or upright offer an instant cross check point that helps ensure the worker is picking from the correct level.
Colors available through lean include:
- White
- Yellow
- Full color

Barcodes
Barcodes have various uses in warehouses. For example, they are used to track inventory, find product locations, monitor the movement of products, track shipping, etc. Barcodes are typically one-dimensional (1D), with vertical lines and spaces, or two-dimensional (2D), which are square-shaped and look like television static (e.g., QR codes).
Check Digits
A check digit is a number added to a coded system, used to help detect errors and ensure the correct item has been picked or put away.
- Can be numeric or alpha numeric.
- Manually entered by picker.
- May be incorporated into barcode or as a separate barcode.
- Typically reverse printed to distinguish from the location code.

Warehouse Labelling with Lean
Clear and precise identification is key to productivity and efficiency. At Lean, we offer a cost-effective solution to all your labelling needs that can be tailored to meet various system requirements. Service we offer include:
- Design and manufacturing of code labels
- Custom printing for your design
- We can also include barcodes, color coding, check digits and directional arrows for your project.


If you already know your project's specifications, you can contact us for help in designing a labelling system and acquiring labelling products for the job. Simply provide the following data:
- Quantity of labels/Number of locations
- Typical code
- Color requirement
- Approximate label size
- Height to top beam

Guide to Warehouse Labelling
There are many factors that impact warehouse labelling. Below are tips and questions to consider to choose the best labels for your needs.
Establish the Requirements:
- Will there be labels on each beam level?
- What is the beam height/depth?
- Is color required? What color is needed?
Color options include:
- White
- Yellow
- Full color
Are barcodes required?
Barcode format:
- Code 39
- Code 128
- 2D
- QR Code
- Other
If yes, are there order pickers in the facility? If no, is a summary label wanted on the first beam with barcodes for all upper levels?
Also consider if labels are needed on the upright as a plate with upper level barcodes. And ask are there existing labels on the beams? If yes, block out material or orange vinyl may be best.
Racking layout:
Use a drawing or blueprint of the racking layout on hand to help you design your labelling strategy.
Determine the number of runs.
Doubles/Back to Back:
Singles:
Number of bays per run?
Number of levels including the floor?
Number of pallet spaces per beam?
Additional requirements
Ask yourself if End of Aisle Markers (standard 11.8 inches x 15.7 inches or 300 x 400mm) are needed for pallet racking? If yes, what is the preferred color (white or yellow) and determine the number of digits per sign?
Also decide if end-of-aisle markers required for just one end of the run or double ended. Finally are floor marking or safety signs needed?
Here is an example of how you can label inventory placement to show warehouse aisle, position and level for your reference.

